The Powermatic 60HH is an 8 inch x 6 feet jointer with a
54 blade helical head.
This unit has a 2 hp motor running on 220v AC. Maintenance Issues... |
|
Moving the Unit
|
|
I picked up the jointer (in three packages) at the dealer. The largest of the three boxes was a wooden
crate that was loaded into the truck with a forklift, |
|
This large crate held the "head
unit" of the jointer, the tables, the fence and the adjustment
area. |
 |
The ~300 pound head unit removed from the
crate. |
 |
The move...with great help from James, Bob, and John. Cindy provided group supervision and took the photos. Here we are loading head unit on to our trusty yellow "Tonka tank".
Note: the grunt labor team consisted of Dr. Holy, Dr. Hirko and Dr. Chow...I felt extemely inadequate and made them call me Doc... |
 |
The trek begins...
(picture managed to catch James's best side) |
 |
Other than a couple of tricky balance points
the trek went well. |
 |
The "many hands" theory meant
that the haul into the shop was "light work". |
 |
The head unit is laid upon the base. |
 |
The moving phase officially ends with the head unit being secured to the base. |
 |
The setup phase consisted of belt install, motor bolt adjustments, power switch install, motor and belt cover panels, dust port, spring loaded safety device, etc.
Some left over screws caused James to actually have to look at the manual!! |
 |
Since the exact, final location for the
unit is yet to be determined, we hooked up "temporary" 220v
electricals and 4 inch dust collection. |
 |
After cleaning the shipping lubricants from the table, the head unit adjustment points, and the helical cutters, the unit is turned on and tested. The first tests: auditory (we love the sound of a Powermatic), tactile (the ~500 lb. weight pays off in terms of vibration), and the first jointing runs were all very successful. Now to fine tune the unit and remodel the north bench unit to provide the proper space. |
 |
First I had to remodel the north west end of the workbench. I used the Festool plunge saw with a 1400mm guide rail (clamped underneath) to allow a simple and safe cut across the top of the bench. |
 |
This enabled me to get to the framework
of the bench. |
 |
I then constructed a narrow frame. |
 |
Added a recycled MDF top to the narrow frame. |
 |
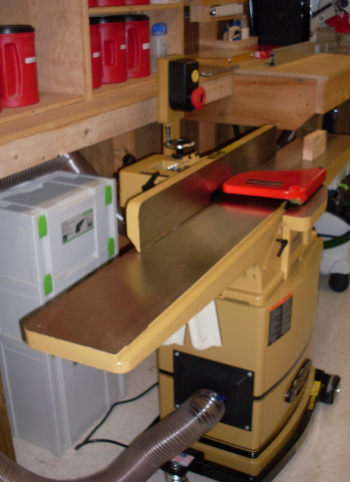
New home for the jointerr...looking north
at the unit. |
 |
Looking west at the jointer. |
 |
Looking east at 60hh. |
 |
Event #1: In 2016 there was a bad noise coming from the cutter area. James and I took off the rear covers and determined that a Woodruff key had come out of the top cutter head pulley. |
 |
View of Woodruff in proper location in cutter pulley. |
 |
There were two 3mm hex screws that were to hold the Woodruff in place and to keep the pulley at the correct location on the shaft. Side view of pulley. |
 |
When the Woodruff got out far enough proud of the pulley it hits on the inside of the pulley cover. See worn spot on right edge of cover. |
 |
Event #2: In 2017 the exact same event occurred while Cindy and I were using the jointer...pulled the same pins, reset the pulley, noticed that the upper pulley and the lower pulley were not in perfect alignment...pulled the belt. The upper pulley had a second hole in the shaft that at first I thought the set screw must go into...but it turns out that it is a final pocket for Woodruff key to sit in. Replaced the two set screws with some Loctite. |
 |
Loosened the motor mount bolts to try and align the two pulleys...got very little joy, some minor improvement...the lower motor pulley is closer to the front of the unit that the upper cutter head pulley. The upper one is fixed, so the motor pulley is the one that must be moved. Noticed that the motor mount plate was bent...put everything back as best I could... |
 |
Event #3 In 2018 it happened again...pulled covers off...had major grief getting out the hex screws held by LocTite.Once again, major problems with the mouter mount bolts...get them all loose and got the pulley off...so, one set screw bites onto the Woodruff key and the second set screw, a quarter turn away, bites onto the shaft. |
 |
From manual: Part # 1 is the socket or hex head screw...this is a 3mm socket, and there are two of them #2 is the pulley #7 is the Woodruff key with an indication where it sits on the shaft of the #8 cutterhead #3 & #4 are the bearing and bearing housing which stay attached to the housing which holds the #8 cutterhead
|
 |
Closer view of the #1 screws and the #7 Woodruff key... |
 |
The Woodruff key... |
 |
View of the shaft with the slot for the Woodruff key... |
 |
So the repair, this time, involved realigning the pulley... |
 |
...replacing the Woodruff key...tapping it in so that the key is not coplanar with the pulley and shaft...
|
 |
| ...it was impossible for me to lift the motor to get this belt back on...dug out the old dependable Reese's Pieces bottle jack and lifted the motor... |  |
...replaced the belt, tightened the motor mount bolts... |
 |
...made everything as happy as possible, tapped the Woodruff key in the slot as far as possible and then dabbed the space in the slot with a hit of silicone caulk... |
 |
...hopefully this will hold the key in place longer. |
 |
Event #4 9/18 |
|
Another key slip out...it shot out far enough that we could not find it...loosened the motor mounts to pull the belt...had to use a bottle jack. |
 |
Planned to JBWeld fill the square line up holes for the key...but ended up that James only put the Weld on the far end of the key...and then installed it into the keyway... |
 |
Used a longer set screw, a 1/4-20 set screw with a 1/8 inch hex drive to shut down on to the shaft. The original 3 mm hex shut down onto the key. |
|
Getting the belt back taut... |
 |
|
There had been some noise in the shaft movement since the Event #4 fix...we had the back cover off so we could see the pulley...had a failure and when we checked the pin had shot out and went several feet. Weld Fix |
|
Performed the normal loosen motor mounts, lift motor, remove belt, remove pulley...and there was still a noise that came when cutter head was single dot up. Cindy and I tried to determine noise location...seemed deeper thanthe knives and more toward the front...decided to pull the cutterhead and see if the bearings were ok. See manual p. 26, figure 39 |
 |
Step 1: Remove fence assembly...bolt B and washer...bolt = 19mm. |
 |
Fence assembly... |
 |
Step 2: Lowered the infeed table.
|
 |
Step 2b...had to remove Fine Adjust locking handle...p. 18 figure 22 |
 |
Step 2c...it took a lot of configuring with dual handles to lower the infeed table... I was not able to lower the outfeed table... |
 |
Step 3: Loosen the socket head cap screws (8mm hex) and tilt the fence support out of the way... |
 |
Step 3b...I simply removed the entire fence support... |
 |
The support... |
 |
Step 4 Remove the rabbeting ledge...14mm bolts. |
 |
Step 5: Loosen the 14mm bolts that secure the cutterhead...back first, then the front...these did not seem overly tight and I believe this was a part of our problem. |
 |
While loosening the front a metal shim fell out...the position of this shim made me think that it had worked itself toward the shaft and this was the cause of the noise...I found two more shims...the red arrow shows the thickest shim and it was the suspected loose shim... |
 |
When all shims were removed there was no noise...when replaced and tightened, there was no noise...so, I decided not to replace bearings...I would go to work on the pulley... |
 |
Key placed into keyway on shaft... |
 |
Pully back on the shaft...hex screws tightened...3mm onto the key, 1/8 onto the shaft. |
 |
 |
|
Prepped and ready to weld over the key slot. |
 |
Slot covered... |
 |
Sanded away a bit with Rotex 60 at 40x. |
 |
I put pulley, belt, and motor back in place...James and I put the rear table movement assembly back on...lubed the bottom the fence unit |
 |
...lubed the top of the fence support unit. Made all adjustments to tables... |
 |

